Another St. Patrick’s Day has come and gone.
It’s funny. Five years ago I never would have thought that I’d be out on St. Patrick’s sitting in a quiet(ish) booth with my husband planning closet space, playing trivia… and having the time of my life! Twelve days to go.
Anyway. I’ve recently discovered the pleasure that are granny squares. Since I started crocheting regularly again, I’ve been so focused on crocheting things I could either wear or make use of, that I haven’t really played. Just played! With different stitches, different yarn weights, patterns, textures… I should have done this AGES ago!
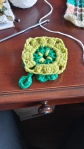
I think this one for St. Pat’s came out pretty good. So if anyone wants to play along or make suggestions or share alterations they made, here is how I did it.
I used standard worsted weight yarn in Dark Green, Light Green, White, and Gold and my handy H-8/5 mm hook.
Stitches/techniques used:
Magic Ring
CH = chain
SL = slip stitch
SC = single crochet
HDC = half double crochet
DC = double crochet
TR = treble crochet
PS = puff stitch
CS = cluster stitch
Row 1 (Dark Green): Turn a magic ring and SC 12 around, pull closed, SL to join
Row 2 (Dark Green): CH 3, DC in first SC and in each one after that, SL to join with the CH 3, tie off and change colors
Row 3 (Light Green): SL through center, *CH 7, skip 3 posts and SL through center,* repeat *-* x 3, SL to join to first loop (4 loops), tie off and change colors
Row 4 (Dark Green): SL around loop from Row 3 leaving a long tail; approx 2 inches,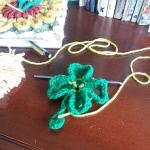 *HDC x 2 around loop, DC x 2, TR x 2, DC x1, HDC x 1, TR x 2, DC x 2, HDC x 2,* HDC around next loop and repeat *-*, continue like this around each following loop, SL to join to initial loop, SC around the tail from the beginning of the row, continue to SC down the tail until about 1/2″ from the end, attach the end back on itself to create a small loop
 Row 5 (Light Green): SL in space between DCs from Row 2 to start the next row, *CH 2, CS in each of the next 3 spaces,* repeat *-* x 3, CH 2, SL to first CH 2 to join, tie off and change colors
Row 6 (White): SL in corner space, CH 2, CS in same space using the CH 2 as first part of the stitch, *CS in each of the next 2 spaces,CS – CH 2 – CS in corner space,* repeat *-* x 2, CS in next 2 spaces, CS – CH 2 in final space, SL to join to CH 2, tie off and change colors
Row 7 (Gold): SL in corner space, CH 2, CS in same space using the CH 2 as first part of the stitch, *DC x 4 in next space, HDC x 4 in next, DC x 4 in final space for that side, CS – CH 2 – CS in corner space,* repeat x 2, DC x 4, HDC x 4, DC x 4, CS – CH 2 in final space, SL to join to CH 2, tie off and change colors
Row 8 (White): SL in corner space, CH 2, CS is same space using the CH 2 as first part of the stitch, CH 2, *(PS, CH 2,) repeat (-) x 3, CS – CH 2 – CS, CH 2,* repeat *-* x 2, repeat (-) x 4, CS in final space, CH 2, SL to join, tie off and change colors
I’m not planning on turning this square into an afghan, so I trimmed my square as follows…
Row 9 (Dark Green): SL in corner space, CH 1, SC in the stitch above the CS from Row 8, (HDC x 5 in 1st space, SC in stitch above Row 8 PS, *HDC x 6 in next space, SC above Row 8 PS,* repeat *-* x 2, HDC x 5, SC above Row 8 CS, HDC x 7 in corner, SC in Row 8 CS,) repeat (-) x 3, SL to join, tie off!
Please share a photo if y’all try it out. I’m still learning to write patterns, so I would love the feedback!
Go! Have fun, play, explore.


