Tag Archives: crocheted

Happy Monday!

Standard

After finishing up this lovely little sunflower to celebrate how gorgeous it’s turning outside…20150316_01

I read this article with my morning tea. Even though I’m not a parent and I found myself reading it from a personal perspective, it still hit home.

I was very much a tomboy as a child… well in all honesty, until my wedding… at 30. I mean sure in my 20’s I finally started wearing makeup when I went out, carried a purse, and had multiple pairs of shoes, but I didn’t really embrace dresses and enjoy being feminine until it was so celebrated during the process of wedding planning and the day of my wedding made that it was made fun (read: acceptable) for me.

At first it was embarrassing. Being fussed over, tugged, pulled, trimmed, painted, draped, all of it made me intensely uncomfortable. Those things were supposed to be superficial and silly and therefore NOT what I do. The desire to not be the stereotypical girl even made me question my life choices, “Do I really want to leave architecture where I’m working as the only female project head to go…. cook?” “Can I still feel strong and capable if I can’t pull my equal weight financially in my relationship?” “Am I still a partner if I’m at home and he’s at work even if it is temporary?”

When did it become a negative way to view yourself? When did I become so ruled by the exact limitations that I was fighting so hard against? It’s ironic really. I’m fighting so hard to not be in the societal box that I’ve put myself in another box with a whole different set of rules and regulations. Now I’m not saying that we shouldn’t still push the boundaries of stereotype and I don’t think the author of the article is either. I think the point is that we can feel strong and empowered and still wear pink lipstick if we want to. Like the #LikeAGirl campaign is seeking to change the stigma that to do something “like a girl” means to do so inferiorly and be somehow less, I want to reshape my perspective on myself. I can be a girl and still defy the stereotypes that seek to confine all of us.

Just because I want to put on a dress, I like to crochet flowers, and my full time job is my home for the time being that doesn’t mean I can’t still have my “screw you” attitude! It’s not about gender. It’s about being true to yourself regardless of what others think. If I find myself being guided in spite of what others think, I am equally as ruled by it. So there’s the motivation this week.

No-one-is-you

Especially if that means you get up everyday and do what you love the best you can.

So go own it. Be you. You’re the only one who can and that is powerful.

Turning The Page On Partial Projects

Standard

To keep myself from packing the whole house all at once and leaving us living out of boxes, I’m finishing partial projects. I’m telling myself this is helpful because I am minimizing the amount of space they are taking up and making them easier to pack… plus who wants to live out of boxes while you’re just waiting to load them in the car and take off? No one, that’s who.

I’ve also discovered my ability to justify crocheting when I should be cleaning knows no bounds… but I digress.

In an effort to challenge myself beyond hats, headbands, fingerless gloves, and scarves and after much scanning of Pinterest for inspiration, I decided to make a tote bag to carry my works in progress. It’s not perfect and it’s taken me far longer than it should have (thanks to general indecision), but I am proud of my bag. I think it’s a fairly decent first effort and it’s mine!

I have no pattern for it. Well that’s not entirely true. I have a partial pattern, but I changed my mind so many times that it’s more the idea of a pattern.

I looked at a bunch of different free patterns online (my goal originally being to finally follow a pattern start to finish to learn how things actually should be done… ha) and unable to decide on one, I roughed a general idea and set off.

20150126_02The original idea was pretty straight forward. A two-handled reusable shopping tote style bag with potentially a solid base. However once I had it worked through and mocked up with handles and all, I wasn’t satisfied and couldn’t put my finger on what was wrong. You know that feeling. It’s not quite what you had in mind, but it’s going to take some more study before you can figure out why. It’s like your subconscious designer has a different plan than your conscious designer, but won’t share. Like a teacher waiting for you to come to an answer on your own before proudly stating they knew all along.

First of all, when I threw it over my shoulder the straps were WAY too long. Plus I’d made the bag rather large compared to my reusable grocery bags, so it was very…. floppy. I tried putting the solid base in the bottom, but it felt cumbersome. Second of all, it was missing a certain amount of panache. No details to speak of to set it apart.

So I put it down to think and two months later I think I’ve got it! Or at least aIMG_20150313_112642 first version. Once I start using it and improving my skill sets (i.e. my awful hand-sewing and the daunting concept of zippers in knits) I know I will come up with some modifications, but at least I’m very happy taking it out for a spin in public now!

On to the next project!

IMG_20150313_194910

It’s my party and I’ll yarn if I want to (Part 2)

Standard

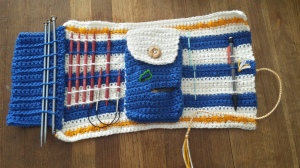
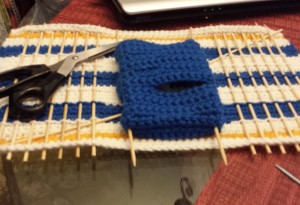
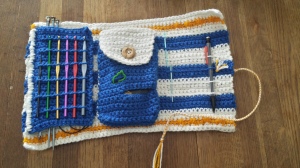
In yesterday’s post we started the latest version of  my crochet hook/knitting needle case (I really need to find a shorter name for this)! Yesterday I left y’all the pattern for the wrap part of the case. Today we wrap it up with the pocket, pocket flap, and optional extra page! (didja see what I did there?)

20150221_02

Notice the slits in the pocket. I use those for easy access for things like sheets of sewing needles, buttons, tape measure, and my small sewing scissors. This way you can load the pocket up with all of your various stuff and not have to unload it to access the stuff at the bottom. The pattern is based on this older pattern I found on Pinterest, so I can’t take credit for all of it. Just the modifications I’ve made. Check out the post from yesterday to see the list of changes I made!

Stitches used:

CH – chain

SC – single crochet

HDC – half double crochet


Pocket

CH 19

Row 1: SC in the 2nd chain from the hook and in each CH across, CH 1, turn (18 SC)

Rows 2-5: SC in each stitch across, CH 1, turn

Row 6: SC in next 4 stitches, CH 4, skip 4 stitches, SC in the remaining, CH 1, turn

Row 7: SC in each stitch across, CH 1, turn

Note: when crocheting through the chains, insert hook under the top two  and over the bottom one. this gives a nice clean edge to your openings.

Rows 8 & 9: SC in each stitch, CH 1, turn

Rows 10-12: Repeat rows 6-8

Row 13: SC in the first 2 stitches, CH 9, skip 9 stitches, SC in the remaining, CH 1, turn

Rows 14-18: SC in each stitch across, CH 1, turn

Row 19: SC in the next 16 stitches, CH 1, turn

Row 20: In back loops only, SC in the next 14 stitches, CH 1, turn

Rows 21 & 22: SC in each stitch across, CH 1, turn; tie off after Row 22.

20150220_01


Pocket Flap

CH 15

Row 1: SC in the 2nd chain from hook and each chain across, CH 1, turn

Rows 2-6: SC in each stitch across, CH 1, turn (14 SC)

Row 7: SC in the first 5 stitches, CH 4, skip 4 stitches, SC in the remaining 5 stitches, CH 1, turn

Row 8: HDC in 2nd stitch skipping the first, SC in the next 12, CH 1, turn (decrease by 1, 13 stitches)

Row 9: HDC in 2nd stitch from hook as before, SC in the next 11, CH 1, turn (decrease by 1, 12 stitches)

Row 10: HDC in 2nd stitch from hook, SC in the next 10, CH 1, turn

Row 11: HDC in 2nd stitch, SC in the next 9, tie off.


Extra Page

Again this is optional. My case doesn’t have an extra page and it works just fine for me because I only crochet. What’s nice is the extra page has loops in both sides for hooks and needles!

CH 15

Row 1: SC in the 2nd CH from the hook and in each CH across, CH 1, turn

Rows 2 & 3: SC in each stitch across, CH 1, turn

Row 4: SC 1, SC in the back loop only for the next 11 SC, SC in last 2, CH 1, turn

Row 5: SC 2, SC in back loops only for the next 11 SC, SC in the last stitch, CH 1, turn

Rows 6 & 7: Repeat Rows 2 & 3

Rows 8-31: Repeat Rows 4-7

Row 32: SC in each stitch across, tie off

20150221_03Additional Notes:

I used buttons that were about 1″ in diameter.

The cord to wrap around the case was attached after the button was sewn on. I knotted 4 pieces of yarn on the inside, brought 2 pieces around each side of the button, and tied it to make sure it was secure. I then worked a fishtail braid for the rest. I think that’s stronger than a normal 3 piece braid.

Let me know what y’all think! I love seeing what others come up with.

As always, leave me comments and recommendations.

I’ll see ya soon with more projects!